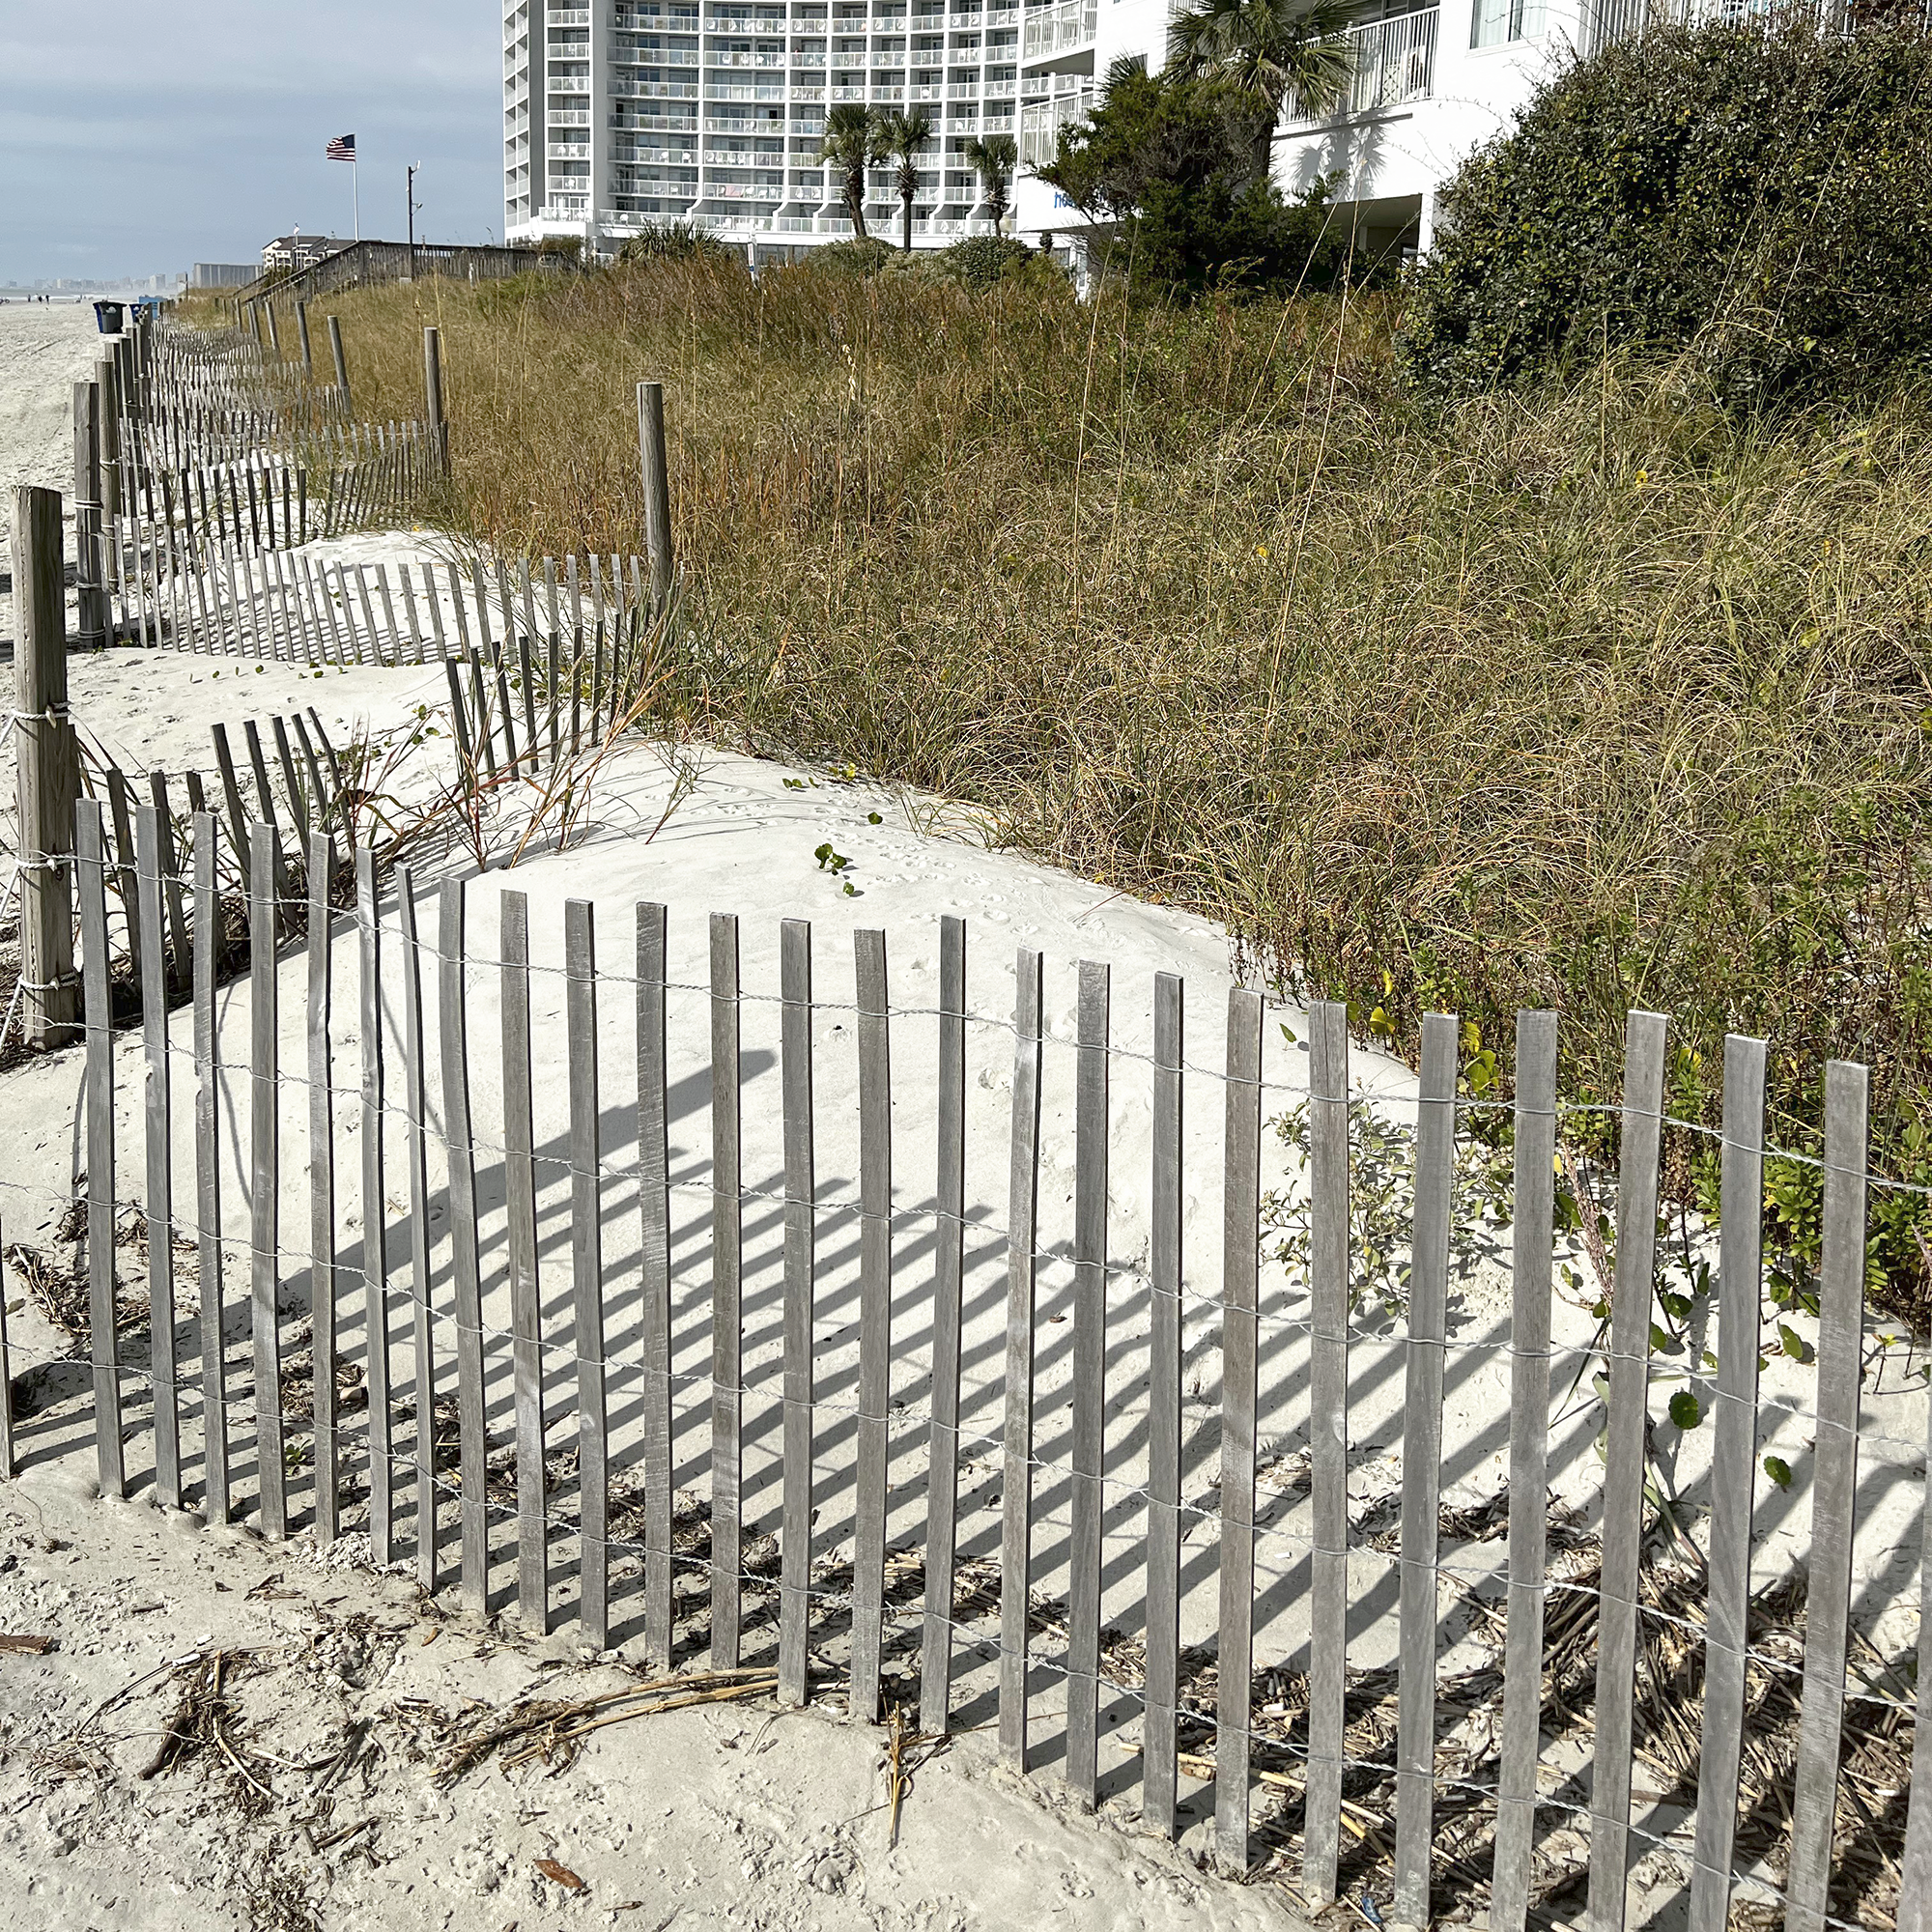
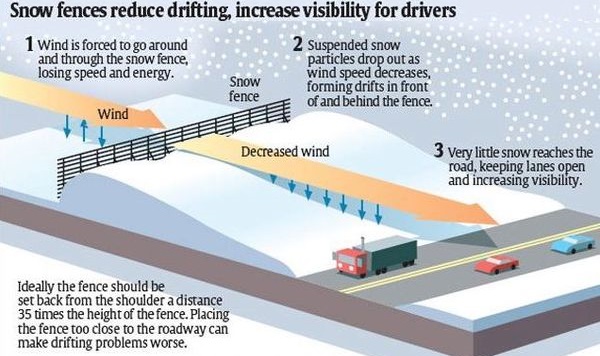
The Wooden Slat Snow Fence is a cost-effective, easy-to-install solution to snowdrift containment, allowing snowdrifts to be created where desired while blocking winds and decreasing the speed and energy of the wind. Any style of snow fence functions by decreasing the velocity of the wind as it hits the fence passing around and through the wood slats. This budget-friendly fence effectively protects a large area on one side of the fence while accumulating a snowdrift on the other side. If properly installed, Wooden Snow Fence provides a strong barrier against drifting snow in both commercial and residential applications through the reduction of wind speed and snowdrift containment.
Getting Started - Researching Wind Patterns And Variables
Installing a snow fence begins with researching winter wind direction as the fence needs to be installed upwind of the area needing snowdrift control and should face perpendicular to the wind pattern. There are three major variables that will ensure the snow fence is being properly installed to protect the desired area.
- Direction Of Prevailing Winter Winds
- Wind Speed & Fence Height
- Estimated Snow Fall Predictions
Winter Wind Directions For Fence Layout
Understanding wind patterns specifically for the winter season is the most important consideration when constructing an effective snow fence. Because the wood slat snow fence is designed to break down wind speeds and decrease the energy of the wind, installing the fence roughly perpendicular to the wind achieves the best results. A perfect perpendicular is not the goal, roughly map the fence layout based on the wind pattern. Winds that blow west to east will need a snow fence on the west side of the area needing snowdrift containment. Winds that blow east to west will need a snow fence on the east side of the area requiring snow protection. For uneven terrains, angling the snow fence up to 25 degrees to create the layout is fine.
Note: If the snow containment area is parallel to your discovered wind direction, still install the wood slat snow fence perpendicular to the wind. Shorter fence sections to bisect the wind can be laid upwind of the containment area at an angle.
Wind Speed & Fence Height
With snow fence of any material, wind speed is a major variable of a well-installed snow barrier fence. Breaking down the percentage of expected snow blow to wind speed can conclude if the fence height is suitable for the area.
Quick Reference Wind Speed, Blown Snow, Fence Height Calculations
- Wind Speeds < 20 MPH Create Blown Snow Averaging 90% Staying Below 48"
- Wind Speeds < 45 MPH Create Blown Snow Averaging 70% Staying Below 48"
Estimated Snow Fall Predictions
This might seem simple, however, checking past years' snowfall accumulation in the area requiring snow control will impact the fence installation. Use any weather tool to check the snow accumulation in recent years for an understanding of what elements to expect your snow fence to face.
Installing The Wood Slat Fence Line
Once a layout is created to best break the wind and create snowdrifts where desired, installing the posts and fence sections will be a quick and easy process. Follow these steps in order to achieve the best results for your snow fence.
Choose Your Line Post Type
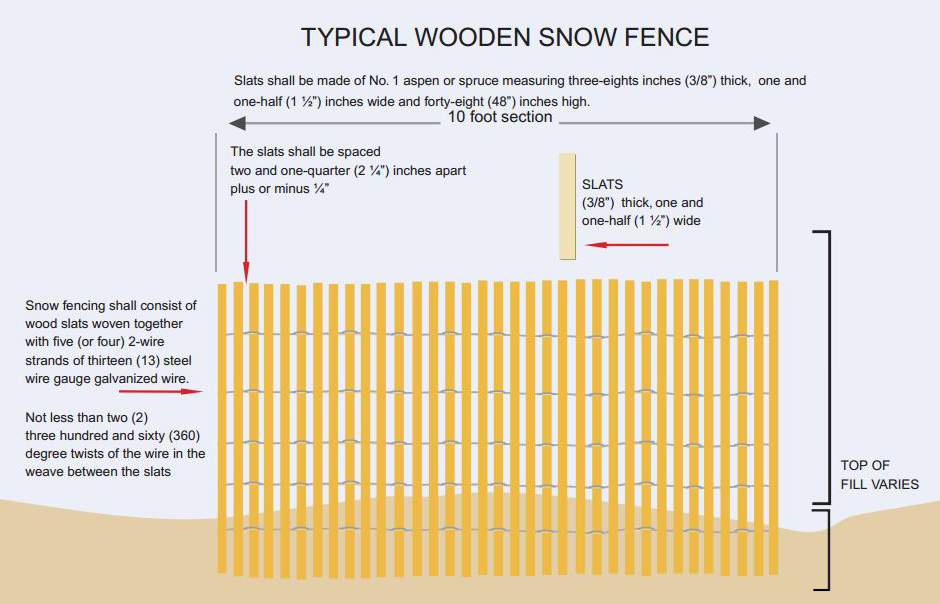
Line Posts are simply posts that are used in a line of fencing to connect fence sections together reliably. Use Steel T-Posts or Sturdy Wood Posts for the line posts of snow wood fence at a maximum distance of 10' between posts. For a heavy-duty layout, shorten the distance between the posts. T-Posts are often referred to as u-channel fence posts or safety fence posts, recommended for barrier control that can stand up to strong winds, and typically have a ground anchor plate that adds stability to the post and fence line.
Complete Install Steps
- Research The Area, Know The Weather Patterns
- Create A Fence Layout For The Containment Area
- Install T-Posts (Line Posts) For Between The Fence Sections (placed a maximum of 10 feet apart)
- Sandwich The Vertical Strand Of Fence Between The Flat Side Of The T-Post & 1" x 2" Wood Slat
- Make Fence Sections Connect Overlap Using 2-Strand Section From Each And Weave a 1" x 2" Slat Through The Overlap
- Always Tension A Traditional Wood Slat Fence By Hand, Using Mechanical Tensioners Is Not Recommended For This Installation
Frequently Asked Questions About Installing a Snow Fence
How Far From The Road Should I Install A Wood Snow Fence?
Wood snow fences should be installed 60 feet or more away from the edge of the road. This distance ensures optimal snow drift control and prevents snow from accumulating on roadways or driveways. If space allows, installing it 100 feet away improves performance. The goal is to position the fence upwind of the area you want to protect.
What Is The Ideal Height For A Wood Snow Fence?
A typical wood snow fence is 4 feet tall, which is sufficient for most residential and light commercial applications. This height helps manage snow drifts effectively while remaining easy to install and maintain. Higher fences may be used in areas with extreme snowfall, but they must be anchored securely. The height directly influences how far downwind the snow will drift.
How Deep Should I Install Fence Posts For A Wood Snow Fence?
Fence posts should be driven at least 3.5 feet into the ground to ensure stability in windy and snowy conditions. In regions with frost, posts should be set below the frost line to prevent heaving. Using T-posts or wooden posts with proper bracing increases durability. Post spacing should be approximately 8 feet apart for optimal support.
Can I Reuse My Wood Snow Fence Each Year?
Yes, wood snow fences are reusable if stored and maintained properly. At the end of winter, carefully roll up the fence and store it in a dry place to prevent rot. Inspect for broken slats or wires before reinstalling each season. With proper care, wood fences can last several seasons.
Does Fence Orientation Matter During Installation?
Yes, orientation is crucial for snow control. The fence should be installed perpendicular to the prevailing wind direction to effectively cause snow to drift in the desired area. The smooth side should face the wind, and the slats should be on the downwind side of the posts. Proper alignment maximizes drift formation behind the fence.
What Are Common Mistakes To Avoid When Installing A Snow Fence?
Common mistakes include placing the fence too close to the area being protected or not anchoring posts deep enough. Installing it parallel instead of perpendicular to wind direction reduces its effectiveness. Skipping tension wires or using inadequate bracing can lead to collapse under snow load. Ensuring correct placement, orientation, and support is key to successful performance.
Contact Us
If you're planning to install a wood snow fence and want to ensure maximum effectiveness, our guide offers all the essential steps and tips for success. From ideal placement and orientation to post depth and maintenance, we cover everything you need to know for a reliable snow control solution. Whether you're protecting a driveway, road, or open area, proper installation makes all the difference in managing winter snowdrifts. Our experts are here to help if you have any questions or need guidance on materials and setup. Reach out today to get personalized assistance and make sure your snow fence is ready for the season!
Contact Us